
Building EON: How I Turned a Raspberry Pi Into a Self-Hosted NAS(And Survived 3 Hardware Failures)

A complete Raspberry Pi 4 NAS build log — architecture, cost breakdown, and the real incidents (SSD corruption, a race condition, a silent permissions bug) that came with it.

TL;DR — Key Takeaways
|
Why I Built a Raspberry Pi NAS: The Problem With "It Works Until I Close My Laptop"
I had a personal knowledge system — a folder of notes that acted as a second brain — living entirely on my laptop. It worked fine, right up until I closed the lid. The moment my laptop went to sleep, the whole system dropped off the network: nothing could read from it, I could not access it on my phone, nothing could write to it, and any automation built around it simply stopped.
I needed something that never sleeps. A cloud VM was the obvious answer, and the one I deliberately ruled out — this system was built on a hard rule of no third-party cloud services touching my data, so a ₹400/month cloud VPS was off the table on principle, not cost. I wanted real hardware, sitting on my own network, doing one job: stay on, ALWAYS.
That's what became the Eon Heartbeat Box — a Raspberry Pi 4 that's quietly turned into the actual home of my entire personal wiki, my family's photo library, and every scheduled job that keeps both alive.
EON NAS Architecture: How the Hardware and Network Fit Together
Three tiers of storage, deliberately separated by role so a failure in one never touches another:
64GB microSD card — OS only. Nothing else touches it, so a corrupted SD card (a classic Raspberry Pi failure mode) never risks real data.
128GB SSD — the fast layer. Runs Docker containers and app state, and doubles as a write-cache for anything newly uploaded.
1TB HDD — the permanent layer. This is where the actual vault, raw files, and photo library live long-term.
Everything runs through Docker in "lean mode" — SQLite instead of a database server, no Redis — because a 2GB Pi doesn't have RAM to spare on infrastructure it doesn't strictly need.

Remote access runs over Tailscale, a WireGuard-based mesh VPN, instead of port-forwarding through my router. No public-facing ports, no attack surface exposed to the open internet — just my own devices, on my own private mesh, wherever they physically are.
Verifying the Hardware: Buying a Secondhand Raspberry Pi 4
The Pi 4 (2GB RAM) was bought secondhand from OLX to keep the total build cost down — but that means verifying it's genuine before trusting it with real data. The seller shared a live video confirming it booted, and I asked for two specific checks to confirm the actual chip and RAM, not just the seller's word:


Alongside the Pi itself, a Samsung EVO Plus 64GB microSD card (U3/A1/V10 rated) was bought new — this card is dedicated entirely to the OS, nothing else.

The secondhand unit came bundled with a case that has a built-in fan and a ¼-20 tripod-mount hole on the underside — useful for wall- or shelf-mounting the finished box.


Flashing Raspberry Pi OS for a Headless NAS Build
Nothing exotic here, but worth showing since it's the actual starting point: Raspberry Pi OS Lite, flashed headless (no desktop GUI — this box never gets a monitor) via Raspberry Pi Imager, with SSH enabled at flash time.


How the NAS Write-Cache and Storage Tiering System Works
This is the part I actually architected, rather than just installed. I didn't want every file write to hit a spinning HDD directly (slow, and it wakes the drive constantly), and I didn't want to rely on a black-box caching layer I couldn't reason about.

The design, in plain terms:
Every upload lands on the SSD first — fast, no waiting on a mechanical drive.
An hourly cron job copies anything new over to the HDD.
The SSD keeps its own copy for 3 days even after the HDD copy exists — a grace window in case a file gets touched again soon after upload.
Only after that window, and only after a SHA-256 checksum confirms the HDD copy is byte-identical, does the SSD copy get deleted. Never delete-before-verify.
I evaluated existing tools for this first — OpenMediaVault, TrueNAS, and LVM caching — and rejected all three. OpenMediaVault and TrueNAS both wanted more RAM than a 2GB Pi has to spare on a persistent background daemon. LVM caching was tempting, but it's a kernel-level black box: no application-level "verify before evict" guarantee, and a failure on one physical drive can compromise the whole logical volume instead of staying isolated to one filesystem I can fsck independently.
I wrote the tiering script myself instead — MergerFS to pool the two drives into one mount point, and a Python script to handle the copy/verify/evict logic on a cron schedule.
How Much Does a DIY Raspberry Pi NAS Cost?
I priced this to be as cheap as possible — the whole point was to prove a genuinely useful home server didn't need expensive hardware or an expensive ₹25,000+ NAS products.
ITEM | COST |
Raspberry Pi 4, 2GB RAM (OLX) | ₹3,200 |
Samsung EVO Plus 64GB microSD (OLX) | ₹300 |
128GB SSD (SATA, USB 3.0 enclosure) | ₹2,000 |
1TB WD Blue HDD (USB 3.0 caddy) (from Chandni Market, Kolkata) | ₹2,000 |
Official Raspberry Pi 5V/3A power supply (Robu.in) | ₹750 |
iBall Piano 43 USB 3.0 hub (4-port, externally powered) (from Chandni Market, Kolkata) | ₹850 |
ProRange 15.3W USB-C power adapter (dedicated hub supply) (from Chandni Market, Kolkata) | ₹500 |
3-pin plug (local store) | ₹100 |
Total build cost | ₹9,700 |
No ongoing subscription cost — everything here runs on hardware I own, on my own network.
* The only recurring expense is electricity for a device that idles well under 5 watts.
5 Real Problems I Hit Building a Raspberry Pi NAS (and How I Fixed Each One)
A clean build log is a lie. Here's what actually broke, in the order it broke — because the debugging is the actually interesting part of any home server build.
Why Wouldn't My Raspberry Pi Connect to Wi-Fi?
First failure, before I'd even gotten to the interesting parts. The Pi wouldn't join Wi-Fi at all — no ping response, no MAC address showing up in an arp-scan of the network, even after trying a different charger to rule out under-power. I never fully root-caused it (possibly a radio or driver issue specific to this secondhand board).
I gave up chasing it and switched to a wired Ethernet (faster, realiable) connection instead, which worked on the first try.
Lesson: when a diagnostic path stalls without a clear signal, sometimes the efficient move is switching to a more reliable mechanism entirely, not debugging the unreliable one further.
Why Was My Tiering Script Reporting Success While Doing Nothing?
I built the tiering script, scheduled it hourly, and watched the heartbeat log report success run after run. Except when I actually checked file counts on the HDD, there were zero real files there — the "29GB used" a disk-usage check reported was just filesystem overhead. The HDD mount point had never had its ownership fixed after a drive swap; it was still root-owned, and the tiering script had been silently failing to write to it since day one, without the log ever surfacing that as an error.
Fixed with one ownership command — the bug wasn't the code, it was an assumption I never verified.
Why Did My SSD Keep Corrupting Itself? (The Real Root Cause)
This was the incident that mattered most. Mid-setup, the SSD hit a hardware I/O error — the kernel log showed the ext4 journal aborting and the filesystem force-remounting read-only. I ran a filesystem check, it reported clean, I remounted — and within minutes it happened again. That pattern (looks fixed, breaks again under normal use) is the signature of a hardware problem being misdiagnosed as a software one.
The actual smoking gun was in the kernel log: a USB device rejection error, immediately followed by a USB disconnect. The SSD wasn't corrupting itself — it was being electrically starved and dropping off the bus mid-operation, and the ext4 corruption was a downstream symptom, not the cause. Both drives were bus-powered directly off the Pi's own USB ports, and I was running the Pi itself on a spare phone charger instead of its proper power supply.
Do the math: an SSD and HDD together can peak around 1–1.2A, right at the edge of everything the Pi's shared USB rail can supply, with zero headroom for the current spikes that happen on drive spin-up.
The fix wasn't a filesystem repair at all. It was a powered USB hub with its own independent power adapter, taking both drives off the Pi's power budget entirely. Once that was in, I ran two full sustained-read stress tests back to back plus real production load on top — zero USB errors, for the first time in the entire saga.
That's the difference between "looks fixed" and actually fixed: a real hardware problem needs a load test, not a clean boot, before you trust it again.
What Is a Race Condition, and How Did It Break My Backup Verification?
Weeks later, once everything was stable, I noticed the tiering job's error count looked suspiciously high — hundreds of "checksum mismatch" errors per run, on files that should never legitimately change: static config files, even the tiering script's own log output. Static files failing a checksum comparison is a strong signal of a bug in the comparison itself, not real corruption.
Reading my own code, the bug was obvious in hindsight: the verification step hashed the SSD copy, then separately hashed the HDD copy, with nothing guaranteeing the SSD file hadn't changed in the gap between those two reads — a textbook race condition. Any file touched between the two hashes, even by an unrelated process, produced a false mismatch.
I patched it to check the file's modification time before and after each hash, and skip the comparison entirely if anything changed mid-read rather than trust a stale result. False mismatches dropped from roughly 600 per run to 1–2, both explainable by genuinely live files.
Why Were My Nextcloud Photos Stuck "Waiting" Forever?
The last real bug: photo uploads through a shared self-hosted photo app kept showing "waiting" forever, never actually indexing into the timeline. The obvious suspects — SQL errors visible in the app log — turned out to be red herrings from old failed attempts, not the live cause.
The actual bug: a bundled binary the photo-indexing app depends on had been extracted from its package without its executable bit set, since the day the app was installed. Every single indexing attempt, for over a week, had been failing on that one missing permission flag.
One permission fix and a container restart resolved weeks of "stuck" uploads instantly.
Monitoring a Self-Hosted NAS 24/7 Without Killing a 2GB Raspberry Pi
The Logic Behind Nextcloud, Syncthing, and Tailscale
Three pieces of software do almost all of the actual work on this box, and each one was picked for a specific job rather than because it was the popular default:
Nextcloud — the self-hosted cloud layer. This is the piece that replaces a paid cloud subscription: it's what actually serves files, photos, and the calendar/contacts back to my devices over the web, with a real UI, not just a folder. I run it in "lean mode" (SQLite instead of a database server, no Redis) specifically because a 2GB Pi doesn't have RAM to spare on infrastructure it doesn't strictly need — Nextcloud is the front door; everything else exists to keep that front door fast and safe.

Figure 10 — The Nextcloud file browser running on the Pi, serving as the self-hosted cloud layer behind the whole setup. Personal folder name and a photo thumbnail blurred out. Syncthing — continuous, real-time sync, not backup. Nextcloud syncs on request; Syncthing runs continuously in the background and mirrors specific folders (like this wiki) between my laptop and the Pi the moment a file changes, with no manual "upload" step. The two aren't redundant: Nextcloud is for deliberately fetching/sharing anything in the vault, Syncthing is for the handful of live-working folders that need to always be current on both ends without me thinking about it.

Figure 11 — Syncthing's dashboard keeping the wiki folder synced between my laptop and the Pi, continuously and in the background. Device names and file paths blurred out. Tailscale — the network layer everything else depends on. Nextcloud and Syncthing both need to be reachable from my other devices, but the Pi sits behind a home router with no public IP I'd want exposed. Tailscale (a WireGuard-based mesh VPN) solves that by putting every device — laptop, phone, Pi — on the same private virtual network, so I reach the Pi the same way whether I'm on the same Wi-Fi or on the other side of the country, with zero ports forwarded and nothing facing the open internet. It's the layer that makes the other two safe to run at all.

Figure 12 — The Tailscale device list — every device on the mesh, all green and connected. Account email, device names, and IP addresses blurred out.
Put together: Tailscale is the private road, Nextcloud is the building at the end of it, and Syncthing is the courier that keeps specific rooms in that building updated in real time. After enough incidents, I stopped trusting "it's probably fine" and manual terminal prompts and built real visibility instead:
Uptime Kuma — pings the Pi, the self-hosted cloud app, and the file share every interval, and pushes a real phone notification (via ntfy, a lightweight open-source push service) the moment any of them goes down.

Figure 13 — Uptime Kuma's live dashboard: all three monitors (Pi ping, Nextcloud, Samba) at 100% uptime. Beszel — a lightweight system-stats dashboard (CPU, RAM, disk, per-container memory), purpose-built for exactly this kind of resource-constrained box, instead of something heavier that would eat 100–250MB of RAM just idling.
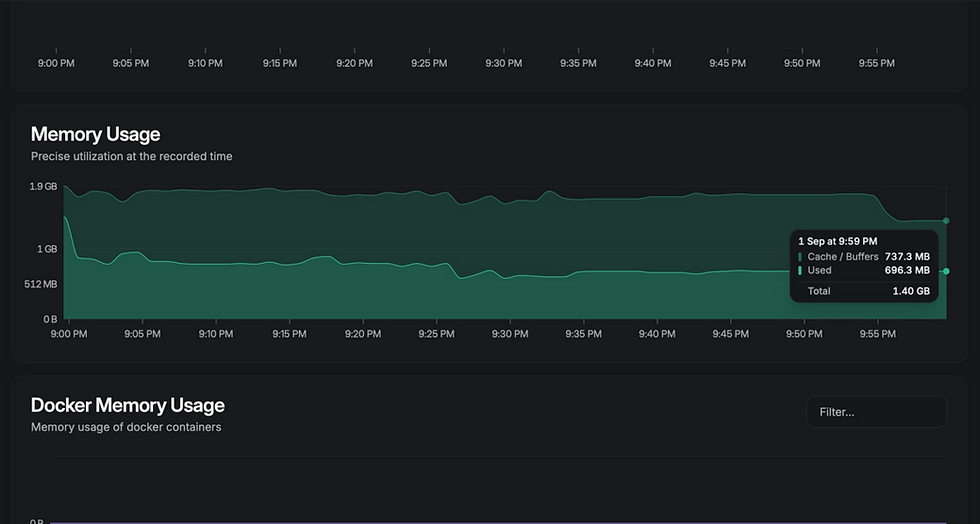
Figure 14 — Beszel's live memory-usage graph — steady around 700MB used of 1.8GB total, comfortable headroom on a 2GB board. A temperature and under-voltage watchdog — checks the Pi's own hardware under-voltage detector every 15 minutes, since that flag directly predicted the power incidents above before I knew to look for it.
What I'd Do Differently Building a Raspberry Pi NAS Again
A few honest lessons, not just a highlight reel:
I should have bought the powered hub on day one. The entire multi-week power saga was avoidable — bus-powering two spinning/flash drives off a 2GB Pi's shared rail was always going to be tight on current, and I only reasoned through the actual power math after three separate incidents forced me to.
A "clean" result after a hardware incident isn't proof of a fix. A filesystem check reporting zero errors, or a clean reboot, tells you the state right now — it doesn't tell you the fault won't recur under load. I learned to demand a real stress test before calling anything actually fixed.
Silent success is worse than a loud failure. The permissions bug that broke tiering for two days did so while the heartbeat log kept reporting green. I've since made a habit of spot-checking real outcomes rather than trusting a log line that only proves a script ran, not that it worked.
What's Next for the EON NAS
A UPS HAT for graceful shutdown on power loss, rather than the Pi just going dark mid-write.
A genuine backup and redundancy plan for the HDD — right now it's the vault's only copy, which is the single biggest remaining risk in this whole system.
Extending EON reach: pulling structured data via automation(from more of my own devices) into the same always-on pipeline this Pi now anchors.
Frequently Asked Questions
Is a Raspberry Pi 4 good enough for a home NAS?
Yes, for light-to-moderate personal use — a single-user or small-family Nextcloud instance, photo backups, and scheduled automation all run comfortably on a Pi 4 with 2GB RAM, provided you run services in "lean mode" (SQLite instead of a full database server, no Redis) and keep an eye on RAM headroom.
Do I need a powered USB hub for a Raspberry Pi NAS?
If you're running more than one USB drive off the Pi's own ports, yes — strongly recommended. Two bus-powered drives can peak at combined current draw right at the edge of the Pi's shared USB power budget, which is exactly what caused the repeated SSD corruption incidents in this build. A hub with its own independent power supply removes the drives from that budget entirely.
Why does my Raspberry Pi keep corrupting its SSD or HDD?
The most common cause is insufficient or unstable power — either an underrated power supply for the Pi itself, or USB drives drawing more current than the Pi's shared bus can reliably provide, especially under simultaneous load. Check the kernel log (dmesg) for USB disconnect or 'device not accepting address' errors, which point directly at a power/connection fault rather than a filesystem bug.
What's the difference between MergerFS and RAID for a home NAS?
MergerFS pools multiple drives into a single mount point without striping or mirroring data across them — each physical drive stays independently readable and repairable, which makes recovery from a single-drive failure far simpler. RAID (as implemented via mdadm or hardware controllers) stripes or mirrors data at the block level for redundancy or performance, at the cost of a failure on one drive more easily compromising the whole array.
How much does it cost to build a Raspberry Pi NAS in India in 2026?
This build came to ₹9,700 total for a Raspberry Pi 4 (2GB, secondhand), a 128GB SSD, a 1TB HDD, a powered USB hub, and all the necessary power supplies, sourced entirely from local Indian retailers and secondhand marketplaces — with zero ongoing subscription cost since everything runs on owned hardware.
Everything in this build — down to the exact commands, incident timestamps, and filesystem UUIDs — will be documented in my upcoming blog. This post is the condensed version; happy to go deeper on any piece of it :)
Comments